Building an Automated Scoring Rig for a Strongman Bag Toss
Strongman bag-toss events are usually scored by a judge watching a sandbag arc over a bar. We replaced the judge with a column of beam sensors, two I²C port expanders, and a string of repurposed truck tail lights — and three weeks later it was running live on a competition floor.
The idea
The event is simple to describe: an athlete throws a weighted sandbag as high as they can, over and over, within a time limit. What’s hard is scoring it live, in front of an audience, without a human squinting at a bar.
My son Calvin competes in strongman competitions and came up with the idea for an automated scoring system.
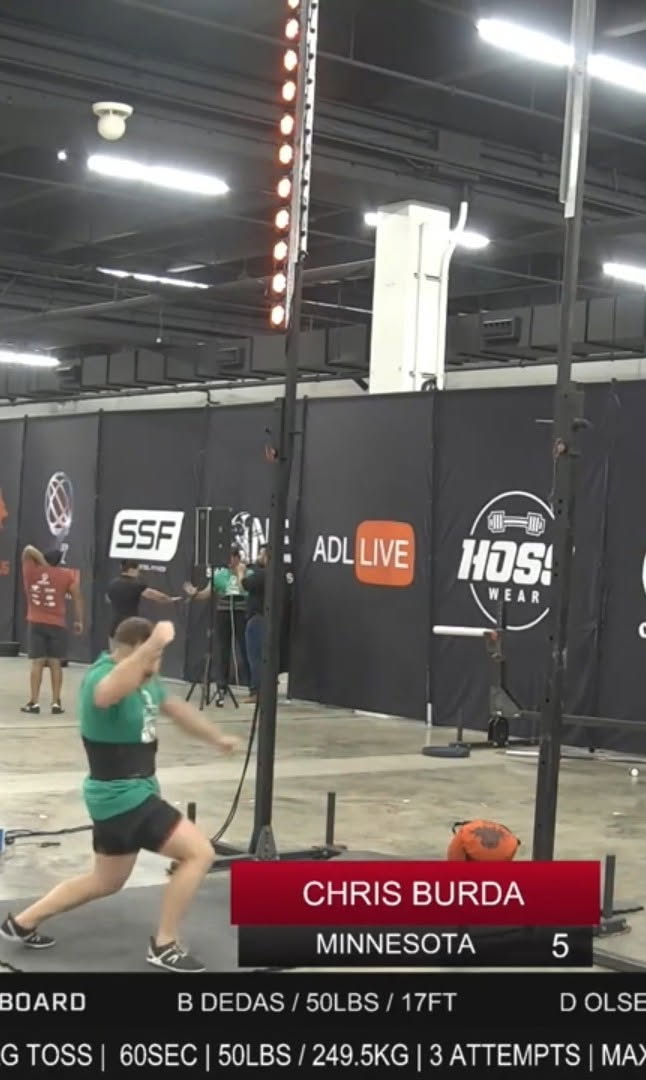
Our solution is a vertical column of beam-break sensors mounted next to the throwing lane, paired with a matching column of lights. When a bag flies past, it interrupts one or more beams on its way up. The controller figures out the highest beam that broke, then fills the light column from the bottom up to that height — instant, visual, no argument. A small box with two buttons (Arm and Reset) runs the whole thing.
Hardware
The build is deliberately low-tech where it can be, because low-tech survives a competition floor:
- Arduino Pro Mini — the brain. Cheap, small, easy to hot-swap if one dies mid-event.
- 12 industrial retroreflective photoelectric sensors (12–24VDC, IP67, 0.1–4m range) as the beam array — the same class of sensor used in factory light curtains, chosen for reliability outdoors rather than anything hobbyist-grade.
- Two PCF8575 16-bit I²C I/O expanders — one dedicated to reading the 12 (of a supported 16) beam inputs, one to driving the 12 (of 16) output lights. This is what let a single Pro Mini, with its handful of native pins, manage 24+ I/O lines over a two-wire I²C bus.
- 12x 4N25 optocouplers on the input side, one per beam — the sensors run at 12–24V and the logic side runs at 5V, so each beam signal gets opto-isolated and level-shifted before it ever reaches the PCF8575.
- Three ULN2003A Darlington driver arrays on the output side, because the “lights” are actually repurposed LED truck tail/stop lights — bright, weatherproof, and available at any auto parts store. The PCF8575’s outputs can’t source enough current to drive them directly, so the ULN2003As do the heavy lifting.
- A 12V AC-DC supply feeding a 12V→5V DC-DC converter — 12V runs the sensors and lights, 5V runs the logic, both off one cord.
- 19-pin and 24-pin connectors breaking out the beam and light harnesses, so the whole rig can be cabled up and struck at a venue without soldering on-site.
All of it was laid out by hand across four sheets of schematic paper — this was never going to be a PCB, it just needed to work and be debuggable with a multimeter.
The firmware: a three-state machine
The logic in bag.ino boils down to a tiny state machine:
ALIGNED LED so the operator can trust the rig before arming), waiting for someone to press Arm.A thrown bag doesn’t break just one beam — it passes through several on the way up (and sometimes on the way back down) — so the runout window makes sure the whole flight is captured before the system decides what the highest beam broken actually was.
1
2
3
4
5
6
7
8
9
10
11
12
13
// find the highest beam broken during the throw
for (int i = numBeams-1; i >= 0; i--)
{
    if ((beamsBroke >> i) & 1)
        bar = min(i, bar);
}

// fill the light column up to that height
for (int i = numLights - 1; i >= bar; i--)
{
    lights.digitalWrite(i, HIGH);
    delay(100);
}
It’s a small piece of code, but the runout-window detail is the part that actually makes it work under real throwing conditions — without it, a bag grazing a low beam on the way down could easily overwrite a genuinely high throw.
From breadboard to broadcast
The git history tells the build’s whole timeline in five commits:
V1.10, first customer-ready version.That’s also the day it showed up on an actual broadcast. The event board reads live scores next to competitor names and sponsor banners (ADL Live, SSF, HOSS Wear), with the light column visible on its pole in the background — proof that a design sketched on graph paper and hand-wired in a few weeks held up under real competition conditions, not just on a bench.
Takeaways
A few things I’d point to if someone else were building this kind of one-off event tech:
- Isolate anything that leaves the board. The 4N25 optocouplers between the 12–24V sensors and the 5V logic meant a flaky field cable or a sensor fault couldn’t take out the Pro Mini.
- Repurposing rugged, cheap parts beats sourcing “proper” ones. LED truck tail lights are bright, sealed, and available same-day — better suited to standing on a pole at an event than most hobbyist LED strips.
- Design the debounce/runout window around the physics of the event, not the electronics. The 1-second runout isn’t an arbitrary constant — it’s there because the thing being measured (a bag’s full arc past a sensor column) takes longer than a single interrupt.
- Hand-drawn schematics and a two-week timeline are fine for a one-off. This didn’t need to be productized — it needed to work correctly once, reliably, for one event. It did, and it’s since been called back for a second competition, running the same hardware and code without changes.